Ball and Roller Bearing Tolerances Explained
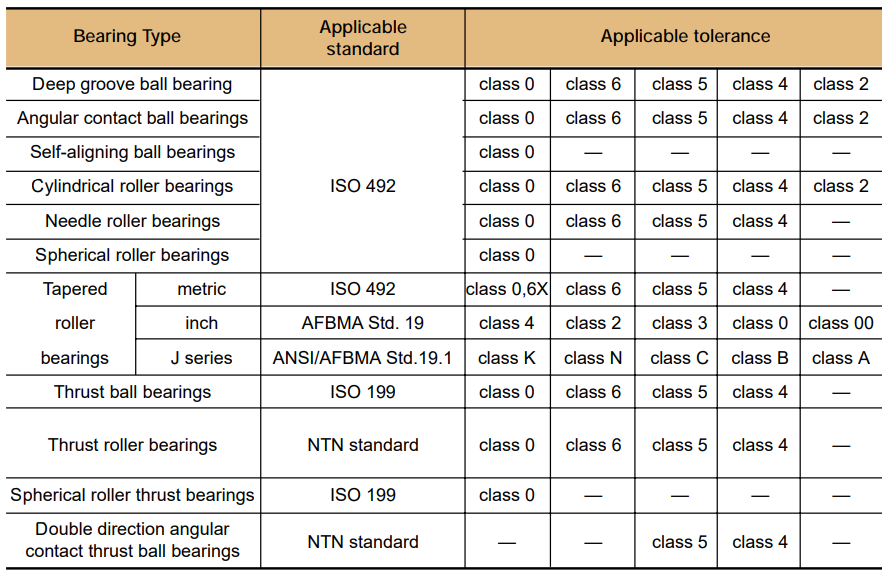
The bearing industry has established widely adhered to bearing tolerance standards. Different countries have their designation such as DIN (Germany) JIS ( Japan) and the American Bearing Manufacturers Association or ABEC (USA). The various country designations will meet the International Standard (ISO). For ball bearings for example the ISO designation is ISO 492. This standard is generally what you will find used or referenced by major companies like SKF, INA, and FAG. Whatever a company calls its tolerance standard it will meet ISO standards.
You will not find a manufacturer of bearings with its own standard, which makes all bearing manufacturers universally interchangeable. But of course, don’t make the assumption that all bearings are created equal. Careful selection and testing will be necessary to prove the axiom of form fit and function for your particular application.
Go to the SKF site and learn more about tolerances, how to specify bearings, and how to have perfect harmony with other machinery components.
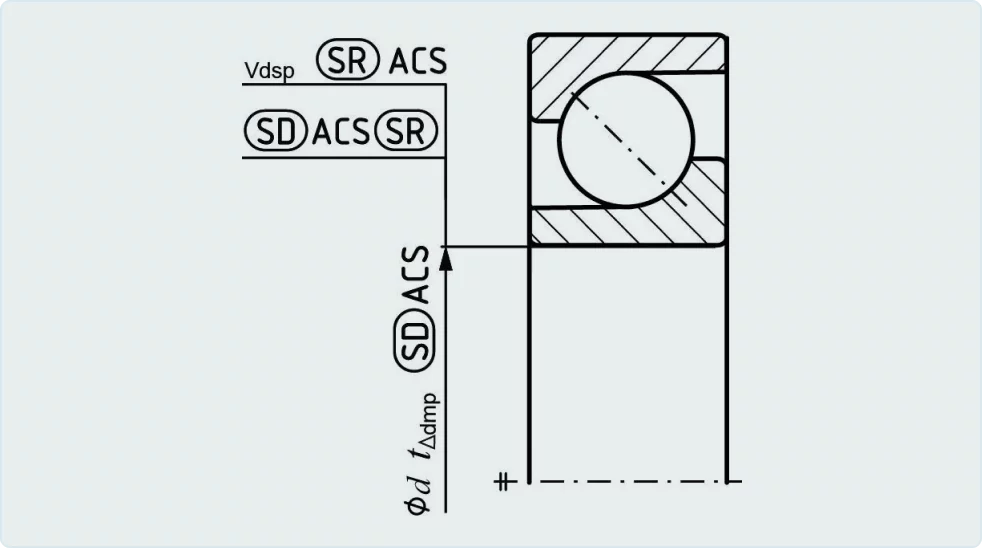
Both ISO 199 and ISO 492 are the basic standards for rolling bearing tolerances. They were revised to incorporate ISO GPS (Geometrical Product Specifications), enabling rolling bearings tolerances and the ISO GPS systems to be based on the same platform.
Companies like SKF using ISO GPS provide better descriptions of its products in terms of functions.
The revised standards give everyone more information about the interface between bearings and machine components. It functionally considers the interface between the bearing and another mechanical part.
In detail, the rolling bearing standards are:
- ISO 199: 2014 rolling bearings – thrust bearings – Geometrical Product Specifications (GPS) and tolerance values.
- ISO 492: 2014 rolling bearings – radial bearings – GPS and tolerance values are now aligned with general ISO GPS standards like ISO 1101 and ISO 5459.
ISO tolerance classes
The ISO (International Organization for Standardization) defines tolerance classes for bearings under the ISO 492 standard. These classes range from normal precision (P0) to ultra-precision (P2), with tighter tolerances indicating higher precision levels.
- ISO P0 (Normal precision): suitable for general applications where standard accuracy is sufficient.
- ISO P6 (Precision): used in applications requiring higher accuracy than normal, such as in electric motors and automotive components.
- ISO P5 (High precision): ideal for applications like machine tools and precision instruments, where high accuracy is critical.
- ISO P4 (Super precision): employed in high-speed and high-precision applications, including CNC machinery and aerospace components.
- ISO P2 (Ultra precision): the highest precision class, used in specialized applications demanding the utmost accuracy, such as in optical equipment and high-precision measurement tools.
ABMA tolerance classes
The ABMA (American Bearing Manufacturers Association) classifies bearings using the ABEC (Annular Bearing Engineering Committee) scale. The ABEC scale ranges from 1 to 9, with higher numbers indicating tighter tolerances and greater precision.
- ABEC 1: Basic precision, suitable for general industrial use.
- ABEC 3: Higher precision, commonly used in automotive and electric motor applications.
- ABEC 5: Precision level appropriate for high-speed and precision machinery.
- ABEC 7: High precision, used in applications such as aerospace and high-speed spindles.
- ABEC 9: Ultra-high precision, used in specialized applications requiring exceptional accuracy.
JIS tolerance classes
The JIS (Japanese Industrial Standards) categorizes bearings under similar precision classes, with JIS 0 being the normal precision and JIS 2 being the highest precision.
- JIS 0: Normal precision, used for standard industrial applications.
- JIS 6: Precision level higher than normal, used in applications like electric motors.
- JIS 5: High precision, suitable for precision machinery and instruments.
- JIS 4: Super precision, used in high-speed and high-precision applications.
- JIS 2: Ultra precision, employed in highly specialized and accurate applications.
Dimensional Accuracy
This parameter includes the permissible deviations in the important dimensions of the bearing components. with particular emphasis on the outer diameter (OD) and bore (inner diameter).
The bearing fits precisely into its housing and onto its shaft thanks to high dimensional accuracy. Excessive deviation in the bore diameter, for example, may cause a loose fit and consequent misalignment or slippage of the bearing under load. On the other hand, a too snug fit may put excessive strain on the bearing material and result in early wear or failure.
Key parameters:
- The maximum difference between the largest and smallest measured bore or OD diameters inside a single bearing is referred to as the single bore/OD variation. Sustaining consistent performance requires minimum variance, which is ensured by high machining accuracy.
- The average of the fluctuations in the OD diameter or bore over a batch of bearings is known as the mean bore/OD diameter variation. It is an indicator of the overall uniformity and quality of the production process’s machining.
Running Accuracy
Running accuracy is determined by a number of parameters, including how round the inner and outer rings are and how they line up with the theoretical rotational axis. Elevated running precision guarantees seamless functioning, reduces noise and vibration, and extends the bearing’s lifespan. Running accuracy defines how well the bearing components rotate without excessive deviation. This includes inner and outer ring runout, which can significantly impact the bearing’s performance and the machinery’s overall efficiency.
Ball bearings offer higher dimensional and machining accuracy with lower runout values, making them ideal for high-speed, low-load applications requiring precise rotational motion. In contrast, roller bearings provide moderate dimensional accuracy and are designed to handle higher loads, making them suitable for high-load, low-speed scenarios where slight dimensional variations are acceptable.
Key parameters:
- The inner Ring Runout rotational axis’s divergence from its theoretical centerline is measured by this metric. Applications needing high precision and low vibration must have little inner ring runout.
- Outer Ring Runout is similar to inner ring runout, this measures the deviation of the outer ring’s rotating axis from its theoretical centerline. Maintaining a low outer ring runout is crucial for ensuring the bearing operates smoothly under varying loads.
Measurement Techniques:
To achieve and verify high running accuracy, various measurement techniques and tools are employed:
Dial Indicators: These are used to measure runout by detecting deviations in the bearing rings during rotation.
- CMMs provide high precision in measuring geometric tolerances, ensuring that the bearings meet the required specifications.
- Roundness tester instruments measure the roundness of the bearing rings, which directly impacts running accuracy.
Pacific International Bearing Sales Inc can assist in selecting the appropriate bearing type for your specific applications. Please contact us for questions or assistance.
 Short Rigid Couplings
 Controlflex Couplings
 Jaw Couplings
 Oldham Couplings
 Bearing Locknuts – TCN
 Double Wide Shaft Collars
 Heavy Duty Shaft Collars
 International Series Shaft Collars
 Keyed Shaft Collars
 Mountable Shaft Collars
 Quick Clamping Shaft Collars
 Set Screw Shaft Collars
 Thin Line Shaft Collars
 Threaded Shaft Collars – Pacific International Bearing Products
 Two-Piece Shaft Collars
 Friction Bearing Universal Joints
 Needle Bearing Universal Joints